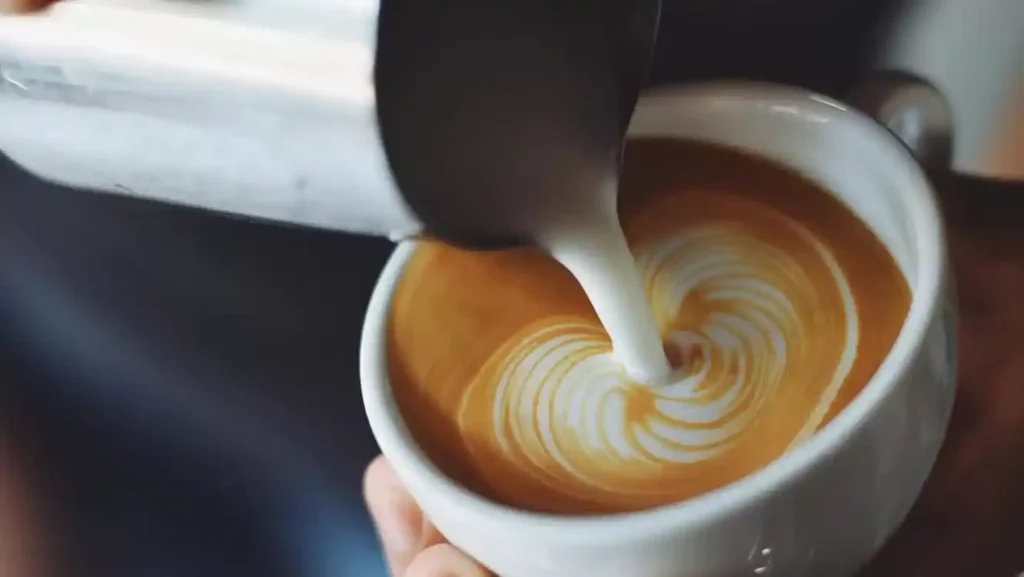
Latte art is a combination of skill, aesthetics, and passion for making coffee. Its essence lies in creating patterns on the surface of coffee using micro-foam from milk. This art emerged in the late twentieth century and quickly became an integral part of coffee culture. In coffee shops, latte art is a sign of professionalism, and for those who aspire to become baristas, it is an important stage of development that allows them to improve their techniques and give guests emotions by giving coffee personality.
Tools and preparation for latte art
It is important to prepare properly for creating drawings on coffee. The basis is made up of high-quality espresso with a smooth, thick crema, and properly whipped milk to a state of micro-foam, it should be tender, glossy, without large bubbles. For pouring, use a pitcher, preferably with a sharp spout for precise movements. Choose a cup with a wide mouth and a round bottom – this will help the pattern to reveal itself better. Everything matters: from brewing coffee to working with milk, and it is with careful preparation that the fine art of latte art begins.
The basics of working with milk for latte art
High-quality foam is the key to a clear and aesthetically pleasing pattern. When frothing milk, it is important to get micro-foam: the milk should be homogeneous, shiny, and without large bubbles. The ideal temperature is 55-65 °C. Frothing begins with placing the steam tube above the surface of the milk to draw in air, and then submerging it deeper to ensure circulation and a velvety texture. Violation of temperature recommendations leads to a number of problems: poor frothing, unstable foam, and flat flavor. The correct temperature and consistency of milk ensures that it mixes harmoniously with the espresso and allows for the creation of designs.
Placing
It is the simplest of the latte art techniques that most baristas start with. It involves the controlled pouring of milk into a single point to create simple shapes: white circles, a heart, the first “bean”. This technique helps develop hand stability and an understanding of the interaction between milk and espresso.
1. Tilt the cup at a 30-45° angle toward you.
2. Start pouring the milk in a thin stream from a height of 5-10 cm.
3. Bring the almost empty pitcher closer to the surface of the coffee, focusing on one point. The foam will begin to form a white spot on the coffee.
4. Finish with a forward movement or a sharp rise of the pitcher if you are forming a “heart”.
The most common mistakes when making coffee:
If you hold the pitcher too high, the milk will break through the cream and spoil the contrast of the image.
Fast pouring does not allow you to control the size and shape of the stain.
Unsuccessful milk texture – the microfoam is uneven, the pattern is blurred.
Practice a steady jet that is not too thin or fast. Check the texture of the milk before cooking. It should be smooth and shiny. Take your time and practice the precise position of your hands and utensils.
Placing is the first step, after which you can move on to more complex styles.
Pushing
This is the next step after the basic Placing. This technique allows you to create a popular element of latte art – the tulip. Its essence is to “push” the foam forward, forming concentrated layers of white that overlap each other.
For one tulip:
1. Tilt the cup at a 30-45° angle toward you.
2. Start pouring from the top until the cup is half full.
3. Lower the pitcher to the surface of the coffee and bring the spout almost to the surface.
4. Start pouring to a point closer to you without moving the pitcher – a white spot will appear.
5. Gently push the pitcher forward to push the foam into the center of the cup.
6. Finish with a pitcher’s lift to “sharpen” the top of the figure.
To create a tulip with several layers, repeat the process several times.
The pitcher’s pace is important: too slow a push “smears” the stain, too fast breaks the ball.
The size of the cup matters, because in a narrow cup, the layers “merge”; it is better to choose a wide one.
Typical mistakes:
- The foam is not pushed through, but spills out – perhaps the pitcher is too far from the surface.
- The pattern is “thin” or fuzzy – the jet is weak or the milk is not well frothed.
- The layers of the tulip merge, which means that there is not enough interval between the strokes.
Pushing is a great coordination and rhythm trainer. Over time, it opens the way to more complex compositions: rose, reverse tulip, multi-layers, and others.

Turbo
It involves controlling the speed of milk pouring, which allows you to create richer and more dynamic patterns, involves intensive and fast pouring of milk at the beginning of the process, and then gradually slowing down to form clear pattern contours.
This technique allows you to quickly form the basis of the picture, provides contrast, texture, improves the smoothness of transitions between layers, increases the dynamism and energy of the pattern.
Turbo requires practice to control the speed and rhythm precisely, but it greatly expands the barista’s ability to create impressive compositions on coffee.
Shaking
Simple and effective for beginners. Tilt the cup, start pouring milk closer to the surface of the coffee, and move the pitcher smoothly from left to right. This technique helps beginners to create beautiful and dynamic leaf or flower patterns.

Fishtailing
This technique is suitable for drawing elegant puffy and wavy fish patterns. It consists of smoothly moving the pitcher backwards while pouring milk. Start pouring milk from a low height, then bring the pitcher spout closer to the latte surface and start making gentle back and forth movements, gradually moving the pitcher back. This movement creates characteristic smooth curves. To be successful, it is important to control the speed and stability of the milk jet.
Cutting
It is used to create clear boundaries in latte art by lifting the spout of the pitcher while drawing. The process begins with pouring milk close to the surface of the coffee to form the basic pattern. Then, in the final stage, the pitcher is slowly lifted upward while moving the spout forward or backward to “cut” or “slice” the pattern, creating clear contours. It is important to control the height, as a spout that is too high blurs the lines, and a spout that is too low makes them fuzzy. This technique adds completeness and clarity to the drawing.
Dragging
It involves using the pitcher’s spout as a brush to draw thin or wide lines on the surface. The pitcher moves smoothly, pulling the milk through the already formed foam, which allows you to draw rapid contours, wavy lines or shapes. The speed and pressure of the pouring affect the thickness of the lines: slow and gentle movements create fine details, and more intense movements create broad strokes. This technique adds depth, dynamics and sophistication to drawings, turning them into true works of coffee art: from leaves and flowers to complex patterns.
Windmill
This is a skillful combination of two patterns into one using smooth rotational movements of the pitcher. It is usually used for complex compositions, for example, a combination of a tulip and leaves or a heart with waves. The technique should be used when you have already mastered the basic movements and want to add dynamics and depth to your drawing. To achieve the best results, control the speed of rotation, the uniformity of the milk jet, and the clarity of your movements. The right milk texture and a balanced rhythm will help you create a harmonious, elegant pattern.
Stacking
The technique involves layering milk foam to create three-dimensional and multi-level latte art patterns. Start by pouring the first layer of microfoam, forming a basic shape, and then carefully add subsequent layers, changing the direction and speed of the jet. It’s important to control the texture of the milk – each layer should be dense but light so as not to blur the previous one. This approach allows you to create deep, three-dimensional patterns, such as tulips with several petals or multi-layered hearts.
Etching
It involves adding small details using special tools such as toothpicks, thin sticks, or metal needles. It allows you to emphasize contours, create patterns, drawings, or even inscriptions on top of the foam. This technique is used after the main pouring of milk, when the pattern is already formed. Etching opens up new opportunities for creativity. It is often used for complex compositions or decorative accents that are difficult to make with just pouring milk.
Common mistakes and how to fix them
Common mistakes in latte art are often related to the texture of the milk and the control of the jet. Pouring methods are also important. Often, milk is whipped too long or not enough, which results in coarse or thin microfoam. Pouring milk too high or too fast blurs the pattern. Baristas also often hold the pitcher far away from the cup and lose control. To avoid these mistakes, it is advised to practice whipping milk to a smooth texture, control the height and speed of the pour, and closely monitor the pitcher’s movements for clear shapes.
How to improve your skills
To improve your skills, it is important to train regularly. Daily practice helps to hone your technique and control the texture of milk. Attend master classes and training courses from experienced baristas where you can get valuable advice and learn new techniques. Participation in competitions motivates you to develop and gives you the opportunity to compare your skill level with other professionals. It is also useful to analyze your own mistakes, watch training videos on various techniques, and experiment to find your own style and improve your skills.
Conclusion
A beautifully executed drawing enhances the aesthetic value of a drink, making it a true work of art. Mastering the techniques allows a barista to become a true professional, develops precision, patience and creativity.
The ability to create patterns is a sign of skill that distinguishes true professionals.